
I'm sorry to bombard you with changes and requests lately, but it seemed necessary to notify my readers about a change I have made to the commenting system on this blog. I was chatting with Gillian over on the Glad Blog (who recently added the Disqus commenting system to her blog), and we pretty much decided that it is a far superior way to comment on the blogs you love and follow. That being said, I have also added the Disqus commenting system to my blog instead
of the old Blogger system. It's very easy to use! Simply create an
account and you're good to comment!
Bloggers love feedback; enough said. In the short amount of time that I've been using Disqus, I have come to prefer it over
Blogger's comment system. Disqus provides you with more real-time updates, enabling you to be far more interactive with the readers who leave comment. The notification and reply system lets you know when someone has left a response, and you can even respond straight from the email instead of having to go back into the comment section of each post to reply.
Disqus also allows you to add media from YouTube, Flickr, etc., and it provides a far more mobile-friendly interface for mobile readers to comment and interact. Disqus also provides great social media interaction, making it easier for you to share on Twitter, Facebook, etc.
These are just a few advantages that Disqus offers (did I also mention that it helps you with SEO by offering plugins that ensure your compatibility with search engines?? A blogger's dream!). As I mentioned before, you only need to set up an account to be able to comment, but if you're interested in adding it to your blog, here is a really easy tutorial.
Head over to the Disqus website. Upon arrival, you will see an orange tab that says "Get This on My Site." When you click the tab, it will lead you to this page below. Simply enter the information it requires and click "continue".

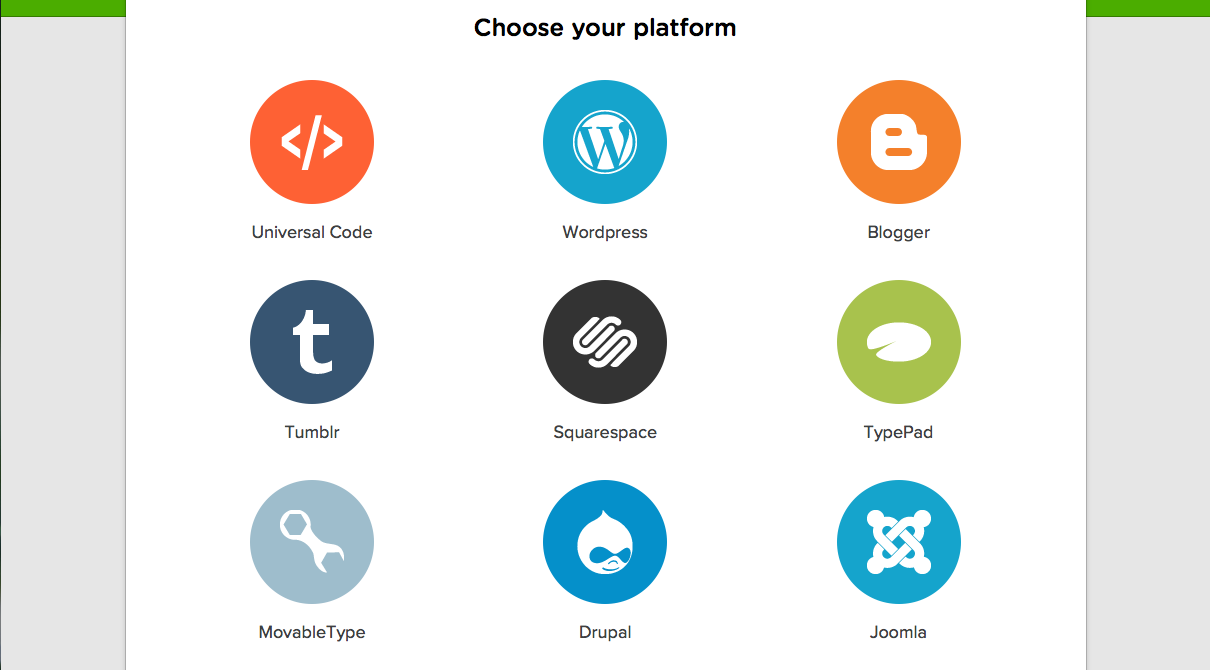
Now it will prompt you to select your blogging platform. Since I am hosted on Blogger, this is what I selected and will be using for this tutorial.
Now you can see the setup instructions for Blogger. Click the link that said "Add Test Blog to my Blogger Website". When you reach this step, it won't say "Test Blog" but will instead read the name of your blog. This was simply for tutorial purposes.

Since Blogger and Google are linked, you're going to see a notification asking for permission to give Disqus access to import itself into your blog. Simply click the blue tab that says "Add Widget".

You're going to be redirected to your layout tab in Blogger. The Disqus widget is going to show up on the right-hand side of the page under the "Add a Gadget" section. You can see where it shows up in the second photo. It will say "Disqus for (Blog Name)". Save the arrangement at the top of the page.


Your blog will now be connected with Disqus and you will see this orange notification at the top of the page. Now what you need to do is Import all of your previous comments into Disqus. Simply click the "Import comments from Blogger" tab. You might also want to enable the syncing of new comments so as to create a seamless transition. Don't worry if all of your comments still aren't showing publicly on your blog. It may take up to 24 hours for this to be completed.

And you're done! Wasn't that easy? Somewhere along the process you may have to verify an email address, but that's no biggie! Hope this helps!
Your method is good , but check my method also chillofyblogging.blogspot.in/2013/06/how-to-add-disqus-comment-in-your-blog.html
ReplyDelete